Viewing and Editing an Employee's Pay Items
This screen is used to process any payments for this employee except leave or termination payments. Any applicable costing splits are also set up here.
The Pay Items section will contain any payments for this employee, including payments for hours worked, allowances, reimbursements or non-cash payments. Normally, the employee's standard pay items will be imported from their file, unless the employee has been added as an adjustment.
Adding a New Pay Item:
- Click on the last entry.
- Click the down arrow on your keyboard to start a new blank line.
- Select the pay item from the drop-down list and then complete the remaining columns:
| Field | Explanation |
|---|---|
| HrsUnit | Enter the number of hours or units to be paid. To pay a negative amount, it is recommended to enter negative units and a positive rate. |
| Uom | Unit of measurement for this item. It cannot be changed. |
| Rate |
The dollar rate to be paid for each unit. The second tab allows you to specify averages - see Calculated Average Rates. |
| Factor | The factor is a multiplication which is applied to the pay item to calculate any weighting, for example in the case of double time the factor would be 2.0. |
| Amount | This will be calculated automatically based on units x rate x factor |
| Job Code | These may be applied if you have Job Codes in place and have ticked the Validate Job Code option in Payrun Preferences (this was covered in Payroll Framework – Module 2 training). When you click the Job Code cell in the relevant Pay Item row, a drop down arrow is displayed - click this to display the list of predefined Job Codes. From this list, select the Job Code that applies to the associated Pay Item. If you are not using Validate Job Codes, then you may simply type in the Job Code to be used for this payrun. |
| Memo | To record any notes relating to this pay item, double click in the memo field. Enter the required memo and then select Print on Pay slip you want the memo to print on a payslip, otherwise it will show only on reports. |
| Tax Weeks | Once a Pay Item has had the “Tax as Backpay, Commission, Bonus” option switched on, the Tax Weeks column becomes active for that item. Simply enter a lump sum payment in the payrun and specify the number of weeks you wish to tax it over. You may then select the option Use “Standard” weekly earnings or, for employees whose pay varies from pay to pay, you may choose Use “Average” weekly earnings. Click Calculate. The system will automatically add the appropriate tax amount, based on the Standard or Average earnings specified, into the payrun. The calculated tax amount is added to the Manual / Extra Ta(x) screen using the “ZBT – Auto Backpay/Commission/Bonus Tax” pay item. |
| Departments | This field appears only for Level 1 costing employees. It defaults to the employee's home department and indicates the department to which the payment will be costed. To cost the employee to a different department, select it from the list. Alternatively you can apply a costing split in the lower section of the window by selecting Multi Costing from the Options button found at the top of the panel. For further information see Costing Allocations. |
Editing a Pay Item:
- Double click the text to edit, then type your changes over the top.
- Click on the Apply button to save changes. Only text on a white background can be edited.
Calculated Average Rates
When viewing an Employee's Pay Items, click on the Rate lookup button:
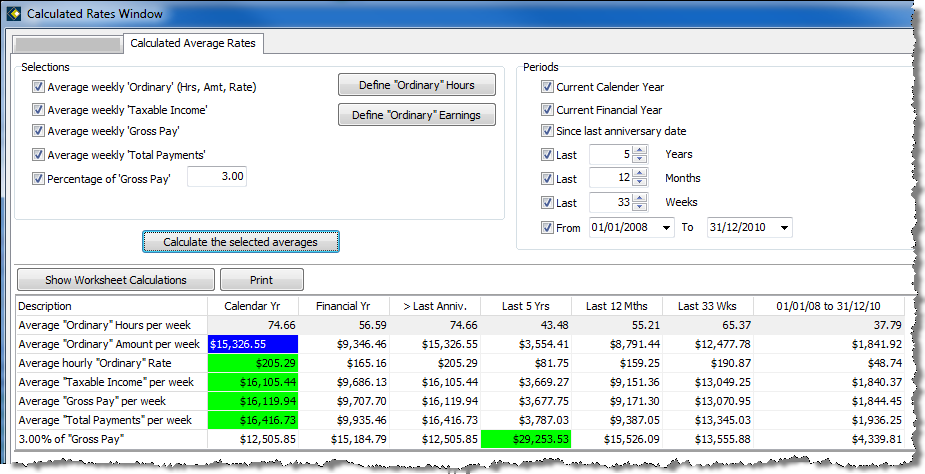
This will display the Calculated Rates Window.

This window allows you to choose both the average rate you want to calculate, as well as the period/s over which you want to average them:

At least one option from Selections and one from Period must be selected. Although you wouldn’t typically select all combinations, the example above has all Selections and Periods options ticked to give you an indication of the flexibility of this new function. In each row of the grid, the highest figure is highlighted as the highest figure is typically the rate that is required to be paid. The Show Worksheet Calculations button will toggle the display of the figures and dates used to calculate each of the selected options. You can also Print a hard copy of the grid options if required.
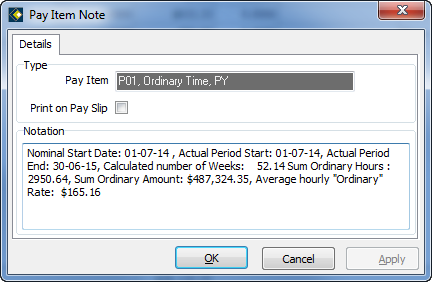
In this window you have the option of selecting a rate to be paid for the payrun line item selected. You simply highlight the cell that contains the rate that you wish to use, click OK, and answer Yes to the confirmation prompt. When a calculated average rate is selected to be included in the payrun, a copy of the relevant worksheet calculations is included in the Payrun line item Memo field and will therefore print on the payrun audit reports as well as the Data Explorer Wage Analysis queries.
Note that Calculated Average Rates can also be added from the Employee file in Pay Items.
Viewing the Employee's Totals and Costing Summary:
The bottom half of the window contains two tabs:
- View Totals which allows you to view a running total of all the components for this pay and the previous pay for the employee. This allows you to compare the two pays. There is also a breakdown of the employee's hours for the pay.
- Costing Allocation which allows you to allocate a portion of costs to departments other than the home department. This section is common for pay items, leave, termination and super employer payments in the payrun. For further information see Costing Allocations.

